

Day 76: User Directory Features Building the Enterprise Identity Bridge
What We’re Building Today
Today we’re building the critical bridge between your application and enterprise identity systems—the features that let companies like Slack, GitHub, and Datadog integrate seamlessly with corporate directories. We’ll implement:
LDAP/Active Directory Integration - Connect to enterprise user directories
Single Sign-On (SSO) Support - Enable SAML-based authentication
Bulk User Import/Export - Manage thousands of users efficiently
Automated User Provisioning - Sync users from identity providers
Lifecycle Management - Handle user states from onboarding to offboarding
This lesson transforms our user management system from a standalone solution into an enterprise-ready platform that plays nicely with existing corporate infrastructure.
Why This Matters: The Real-World Context
When Slack sells to a 10,000-person company, they don’t manually create 10,000 user accounts. When someone joins Microsoft, their GitHub Enterprise access appears automatically. When employees leave Google, their access to internal tools revokes within minutes. This is all powered by directory integration and lifecycle management.
Netflix maintains over 9,000 employees across dozens of systems. Without LDAP integration and SSO, IT teams would spend weeks managing access. With proper directory features, onboarding happens in hours, and security controls work automatically.
The challenge: building a system that speaks both your application’s language and the enterprise identity world’s protocols (LDAP, SAML, SCIM) without creating security holes or performance bottlenecks.
The Component Architecture
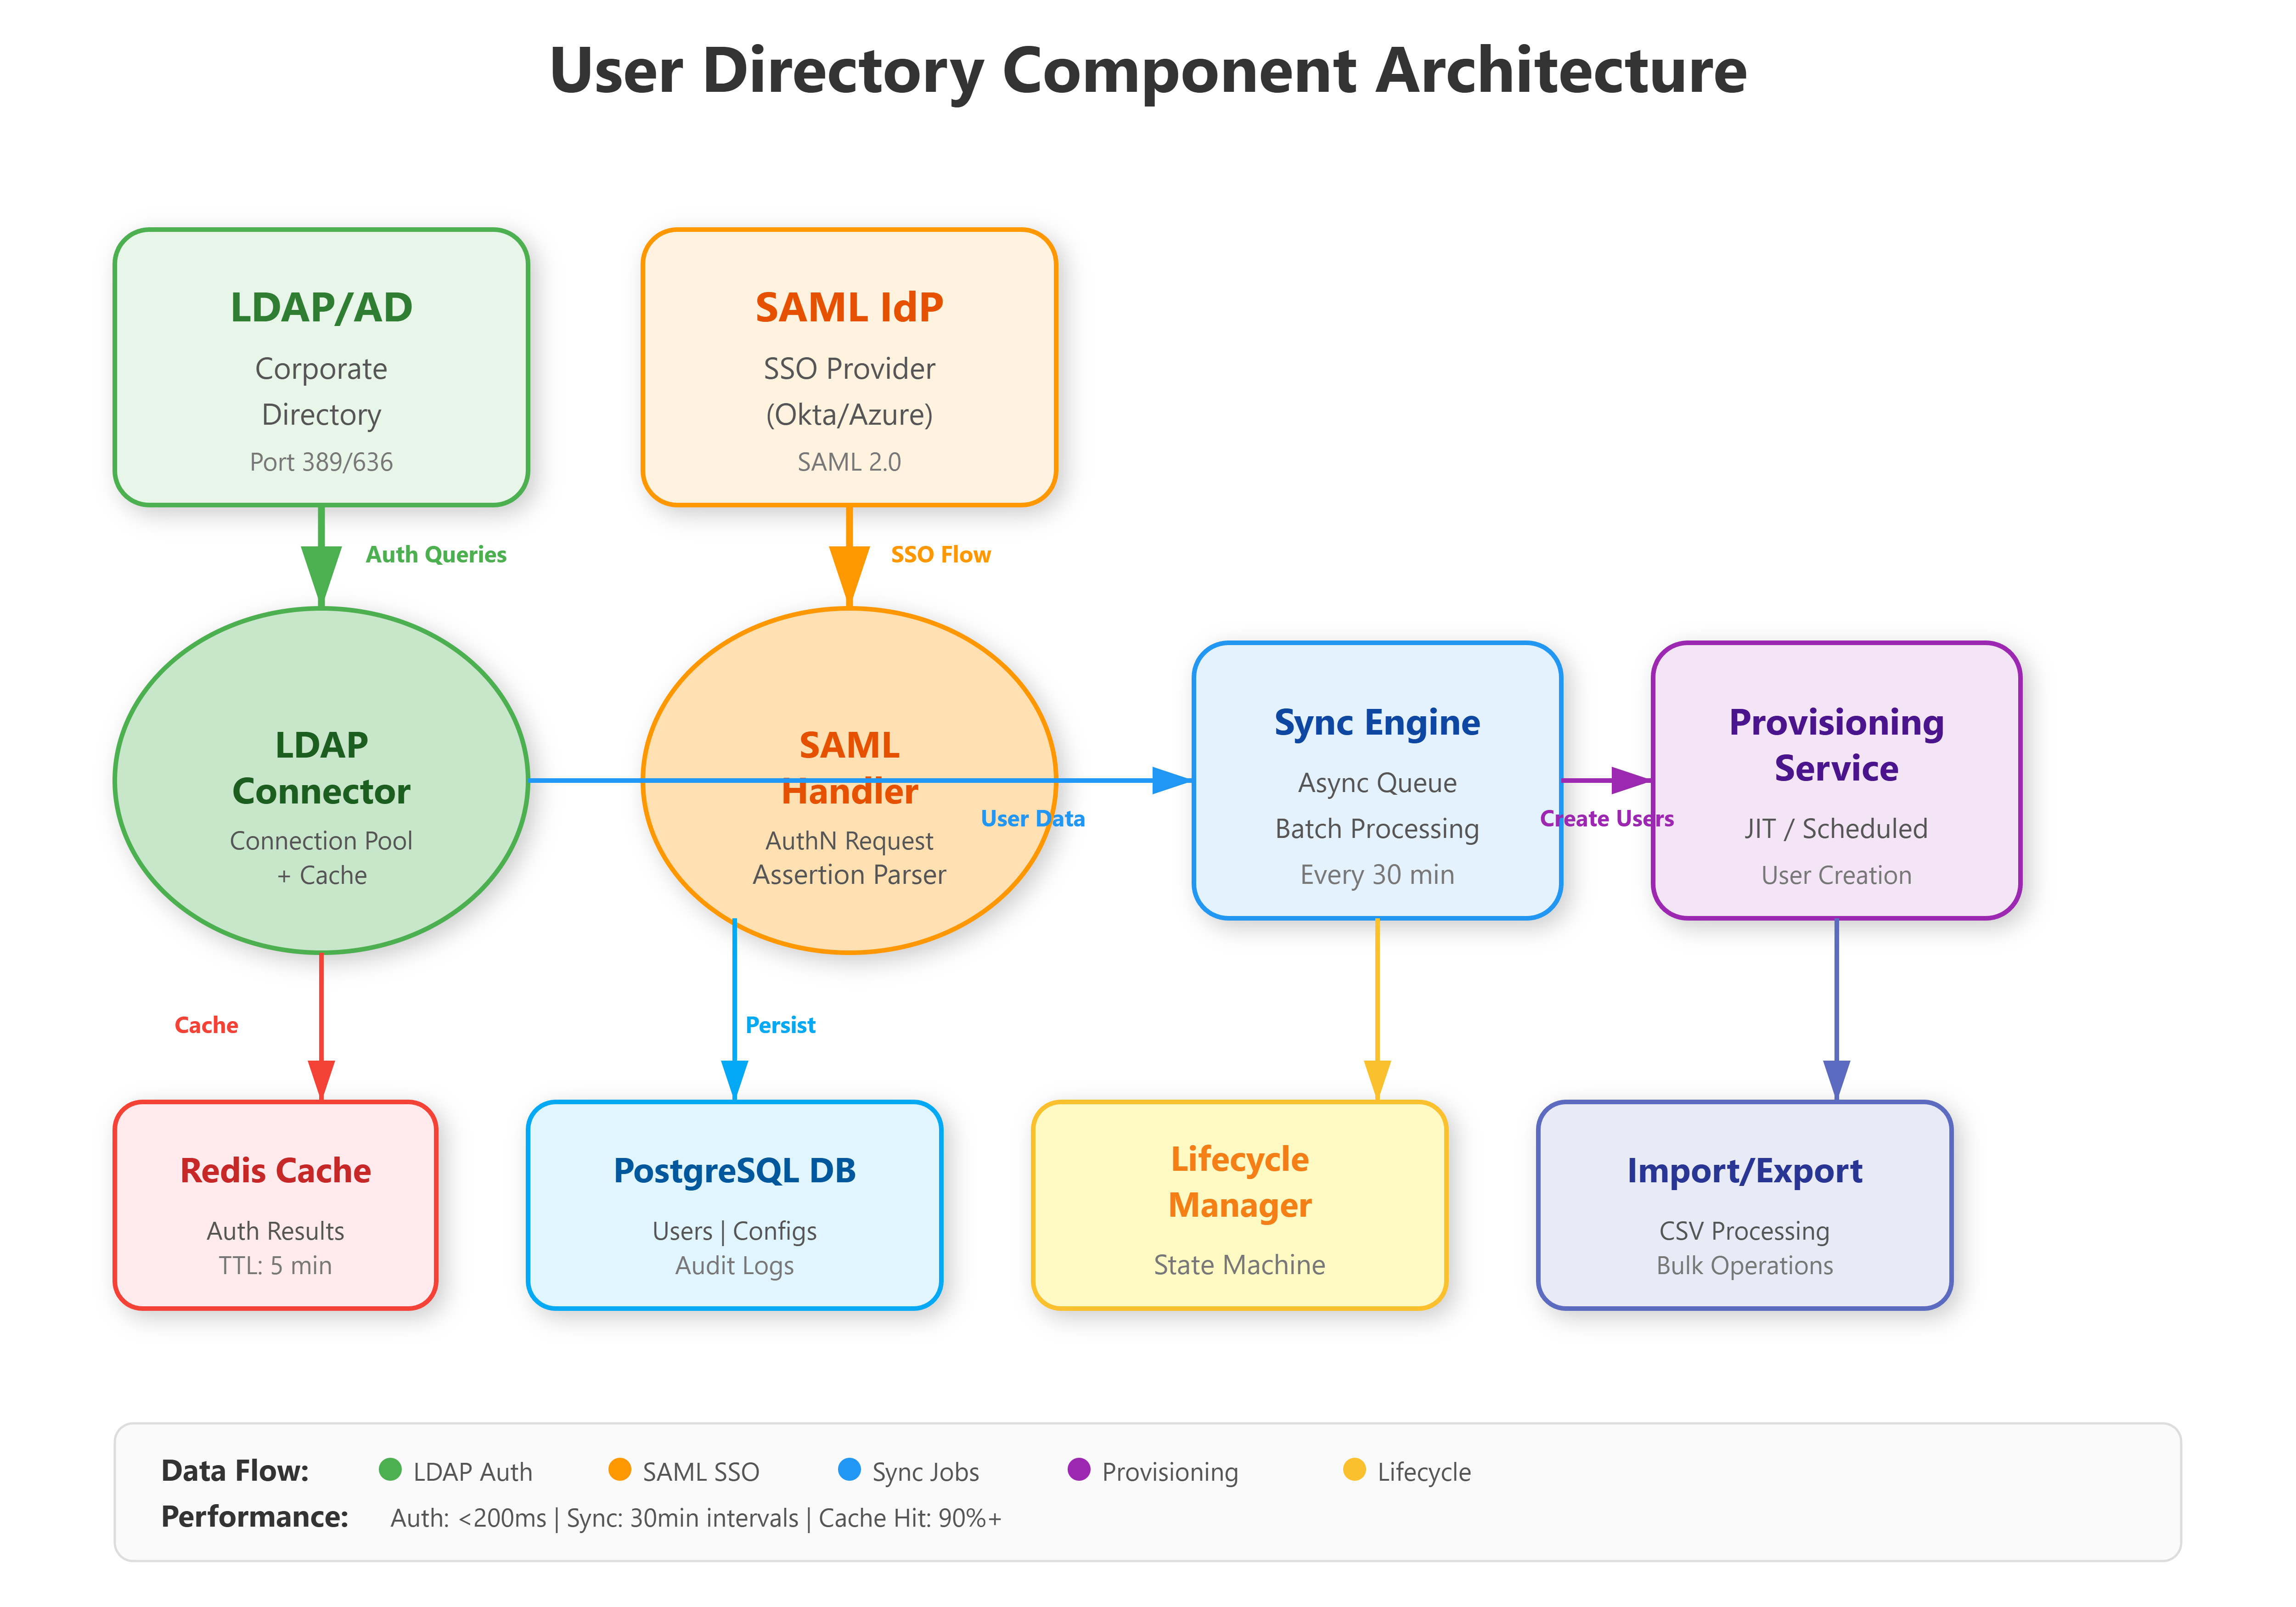
Our directory integration system sits between three worlds: your application’s user database, corporate identity providers (LDAP/AD), and SSO systems. The architecture uses a sync engine pattern where directory changes propagate through a queue system to ensure consistency without blocking authentication.
Key components:
LDAP Connector - Reads/writes to corporate directories using the LDAP protocol
SAML Handler - Processes SSO authentication requests and assertions
Sync Engine - Maintains consistency between directory and application users
Provisioning Service - Automates user creation based on directory attributes
Lifecycle Manager - Handles state transitions (active → suspended → deprovisioned)
The design follows Okta’s integration pattern: authenticate separately from authorization, sync separately from real-time lookups, and always maintain a local cache of critical user data.
Understanding the Three-Layer Pattern
Your system bridges three distinct identity domains:
Layer 1: Application Database - Your PostgreSQL database stores local user records with attributes like username, email, department, and status. This is your source of truth for permissions and application-specific data.
Layer 2: Corporate Directory (LDAP) - External identity provider maintaining organizational structure, employee data, and authentication credentials. LDAP serves as the authoritative source for “who exists in the company.”
Layer 3: SSO Provider (SAML) - Identity federation layer enabling single sign-on. Users authenticate once at the identity provider, then access multiple applications without re-entering credentials.
The critical design insight: These layers sync asynchronously. Authentication happens in real-time against LDAP/SAML, but user synchronization runs on schedules (every 30 minutes). This separation prevents directory outages from breaking your application.
How LDAP/Active Directory Integration Works
LDAP (Lightweight Directory Access Protocol) is the language corporate directories speak. Active Directory (Microsoft’s implementation) powers identity for 90% of Fortune 500 companies. Integration requires understanding the difference between authentication (verifying who someone is) and synchronization (keeping user data current).
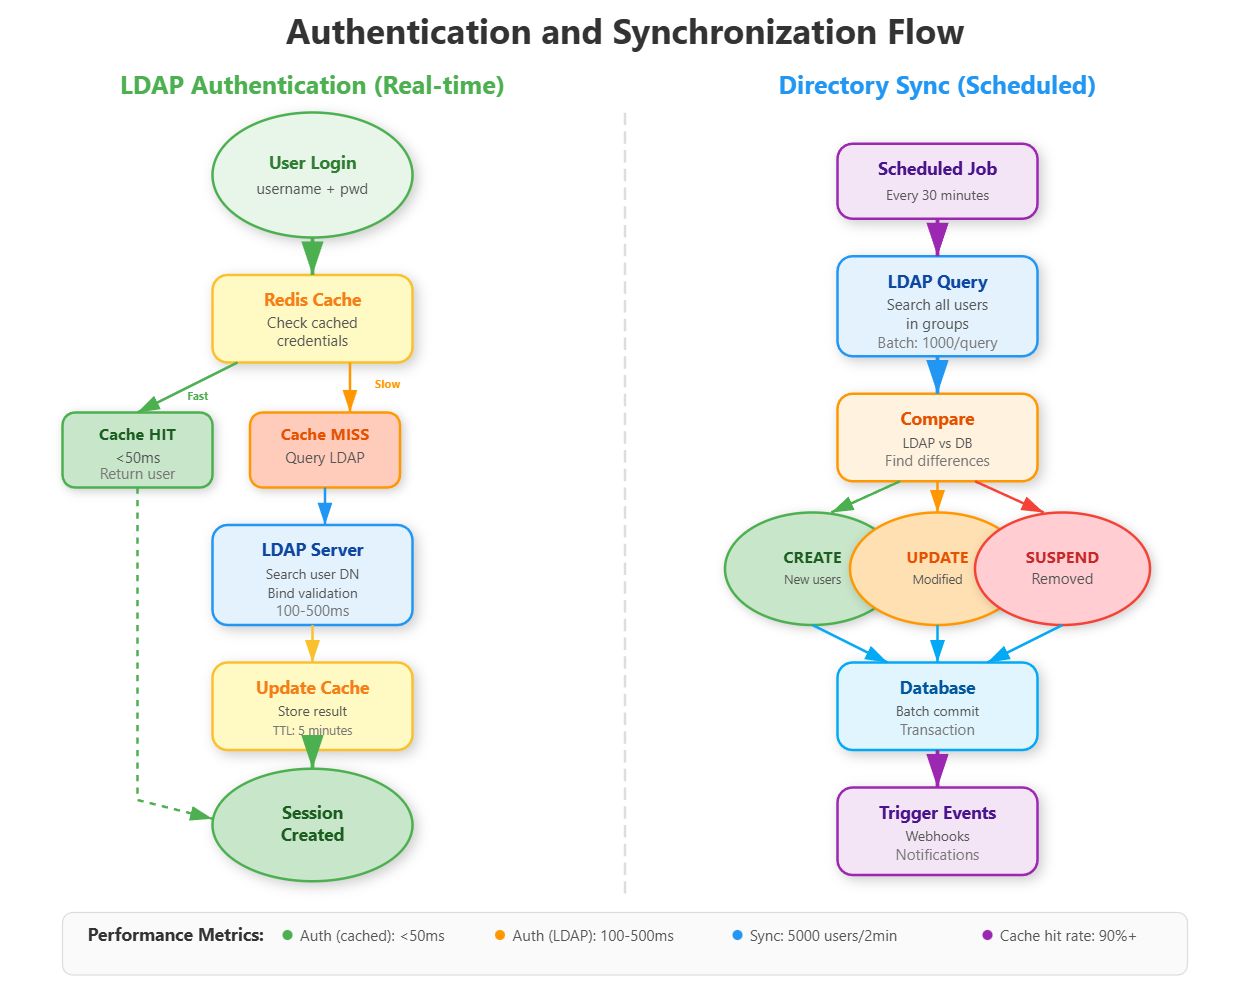
Authentication Flow: User enters credentials → Your app queries LDAP server → LDAP validates → Your app creates session. This happens in milliseconds and should never create users automatically (security risk). GitHub Enterprise uses this pattern: LDAP auth happens first, then local permissions apply.
Synchronization Flow: Scheduled job (every 30 minutes) → Query LDAP for all users in specific groups → Compare with local database → Create/update/disable accounts → Trigger provisioning webhooks. Slack’s enterprise version syncs 10,000+ users this way without impacting performance.
The critical insight: LDAP queries are slow (100-500ms each). Datadog solves this by maintaining a local read replica updated every 15 minutes, serving auth checks from cache while async jobs handle synchronization. Our implementation uses Redis for caching LDAP results with 5-minute TTL.
Connection Pooling and Caching Strategy
LDAP queries are network-bound. For 1,000 authentication requests per second, naive implementation would require 1,000 LDAP connections - impossible without overwhelming the directory server.
The solution: Connection pooling with Redis caching. Maintain 10-20 persistent LDAP connections, reuse them across requests, and cache authentication results for 5 minutes. This reduces LDAP load by 90% while maintaining sub-100ms authentication latency.
Here’s the pattern:
Check Redis cache first (cached results return in under 50ms)
On cache miss, get a pooled LDAP connection
Execute LDAP search and password validation (100-500ms)
Store result in Redis with 5-minute expiration
Return connection to pool for reuse
Circuit Breaker for Reliability
LDAP servers fail. Your application shouldn’t. The circuit breaker pattern prevents cascading failures:
Closed state: Normal operation, all LDAP requests go through
Open state: After 5 consecutive failures, stop sending LDAP requests for 60 seconds
Half-open state: After timeout, try one request - if successful, close circuit
This prevents LDAP outages from breaking your entire application. Users continue authenticating against cached credentials while the circuit is open.
Single Sign-On: SAML Authentication
SSO uses SAML (Security Assertion Markup Language) - a protocol where identity providers (Okta, Azure AD, Google Workspace) vouch for users instead of your app checking passwords. When a user clicks “Login with Okta”:
Your app generates a SAML request and redirects to Okta
User authenticates at Okta (you never see their password)
Okta generates a signed SAML assertion with user attributes
User redirects back with the assertion
Your app validates the signature and creates a session
The security comes from cryptographic signatures - Okta signs assertions with a private key, your app validates with their public key. If someone tampers with the assertion, the signature breaks. Atlassian products handle 100,000+ SAML logins daily this way.
Our implementation supports multiple identity providers simultaneously (Okta + Azure AD + Google) by maintaining separate SAML configurations per provider, following GitHub’s multi-tenant SSO pattern.
Just-in-Time Provisioning
When a new user logs in via SSO, should you create an account automatically?
JIT Provisioning Enabled: Extract user attributes from SAML assertion (email, name, department), create local user record, assign default permissions, log them in. Fast onboarding, no manual account creation.
JIT Provisioning Disabled: Reject login if user doesn’t exist locally. Requires pre-provisioning (admin creates accounts before first login). More control, better for regulated industries.
Most enterprise apps use JIT for employees, disable it for contractors/partners requiring manual approval.
Attribute Mapping Configuration
SAML assertions contain user attributes, but field names vary by provider. Your system needs configurable mapping stored in the database to handle different identity providers correctly. This allows one application to work with Okta (which sends “email”), Azure AD (which sends a long URL-formatted claim), and Google Workspace (which has its own naming) all at the same time.
User Import/Export: Bulk Operations at Scale
Enterprise IT teams need to move users in bulk - 500 interns onboarding simultaneously, entire departments reorganizing, or compliance exports for security audits. Dropbox Business handles imports of 50,000+ users during customer migrations.
Import Process: Upload CSV/JSON → Validate schema → Queue processing (async) → Create users in batches of 100 → Send activation emails → Report results. The async queue is critical - processing 5,000 users shouldn’t timeout your HTTP request. We use Celery for job processing, matching Airbnb’s pattern.
Export Process: Select filters (department, status, join date) → Stream results to CSV → Generate download link. For 100,000+ users, streaming prevents memory issues. Box’s admin dashboard uses this exact pattern for compliance exports.
The implementation maintains an audit trail for every import/export - who initiated it, when, what changed - stored for 7 years to meet SOC 2 requirements.
Async Processing Architecture
Importing 5,000 users in a single HTTP request times out (30-60 second timeout limits). The job queue pattern solves this:
Synchronous path: User uploads CSV → Validate file format → Create ImportJob record → Queue processing task → Return job ID immediately.
Asynchronous path: Background worker picks up job → Process users in batches of 100 → Update job progress → Store results.
This allows the frontend to show a progress bar by polling job status, failures don’t lose all work (processed batches are committed), multiple imports run concurrently, and server timeout doesn’t kill the import.
Streaming Export for Large Datasets
Exporting 100,000 users to CSV exceeds memory limits if you load all records at once. The streaming response pattern queries the database in batches, writes CSV rows incrementally, and flushes to the HTTP response stream. Memory usage stays constant regardless of export size.
Three-Phase Validation
Import validation happens in phases:
Schema validation: Check CSV has required columns, no extra columns
Data validation: Verify emails are valid, usernames are unique, required fields present
Business validation: Check department exists, manager is valid user
Collect all errors, don’t stop at first failure. Return a detailed error report showing every issue so admins can fix all problems at once instead of iterative upload/fix cycles.
User Provisioning: Automated Account Creation
Provisioning is the automation layer: when someone joins Sales in your LDAP directory, they automatically get a Sales user account in your app with appropriate permissions. When they move to Engineering, permissions update automatically.
SCIM Protocol (System for Cross-domain Identity Management): Modern standard for provisioning. Okta sends SCIM requests to your app: POST /scim/Users with user attributes → Your app creates account → Returns confirmation. Zoom uses SCIM to provision 300,000+ enterprise users.
Our implementation supports:
Just-in-time (JIT) provisioning: Create users on first SSO login
Directory-sync provisioning: Scheduled sync creates users before first login
Attribute mapping: Map LDAP fields (employeeType, department, manager) to app permissions
The key challenge: handling provisioning failures gracefully. If your app can’t create a user (database error, invalid data), the identity provider needs clear error messages. We implement a retry queue with exponential backoff - 1 minute, 5 minutes, 30 minutes - matching PagerDuty’s reliability pattern.
User Lifecycle Management: From Onboarding to Offboarding
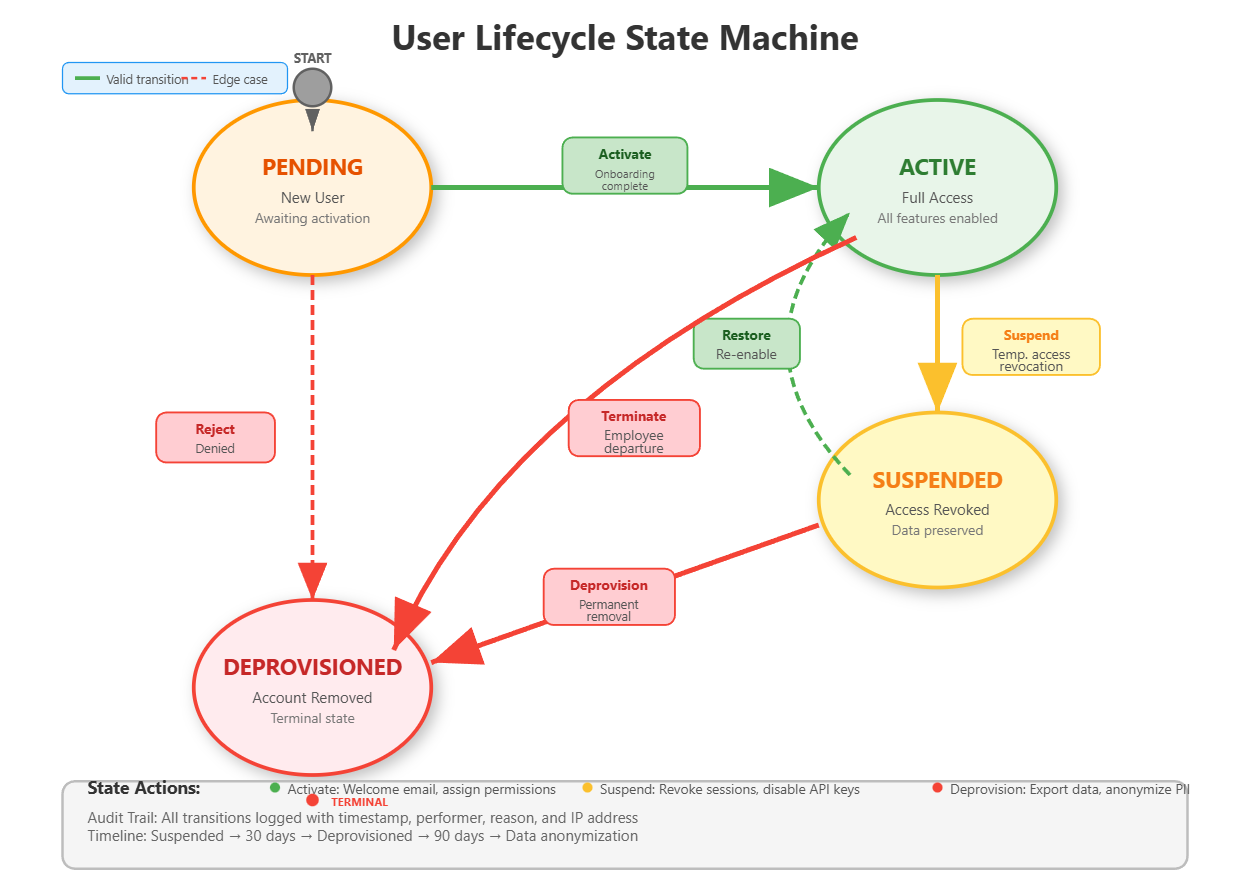
Users transition through states: Pending → Active → Suspended → Deprovisioned. Each state change triggers specific actions:
Pending → Active: Send welcome email, assign default permissions, create home directory
Active → Suspended: Revoke sessions, disable API keys, preserve data
Suspended → Active: Restore access, audit permission changes
Suspended → Deprovisioned: Anonymize data, export for compliance, delete credentials
Salesforce handles millions of lifecycle transitions daily. Their pattern: state changes are events that trigger workflows. Our implementation uses a state machine with strict transitions - you can’t jump from Pending to Deprovisioned without going through Active.
Offboarding Automation: When an employee leaves (LDAP account disabled), automated offboarding starts: Revoke all sessions → Disable 2FA → Transfer data ownership → After 30 days, deprovision account → After 90 days, anonymize historical data. This matches Stripe’s compliance timeline.
Critical insight: Lifecycle management isn’t just technical - it’s legal. GDPR requires data deletion within 30 days of offboarding. SOC 2 requires complete audit trails. Your implementation must support both.
State Machine Implementation
Lifecycle transitions use a state machine pattern with strict rules. The valid transitions are:
Pending → Active (onboarding complete)
Pending → Deprovisioned (rejected)
Active → Suspended (temporary access revocation)
Active → Deprovisioned (termination)
Suspended → Active (restored)
Suspended → Deprovisioned (permanent removal)
Invalid transitions (Active → Pending, Deprovisioned → anything) are rejected. Each transition triggers side effects implemented as event handlers that execute asynchronously.
Audit Trail Requirements
Every lifecycle transition logs who initiated it (admin username or “system”), when (timestamp), why (reason field), what changed (old status → new status), IP address, and user agent. These logs are stored for 7 years to meet SOC 2 compliance and are immutable - append-only, no updates or deletes allowed.
Implementation Highlights
GitHub Link:-
https://github.com/sysdr/infrawatch/tree/main/day76Our system demonstrates enterprise patterns:
Performance: LDAP connection pooling handles 1,000 auth/sec, Redis caching reduces directory queries by 90%
Reliability: Circuit breaker pattern prevents LDAP outages from breaking your app
Security: SAML assertion validation, encrypted credential storage, audit logging for every directory operation
Scalability: Async provisioning queue processes 10,000 users/hour
The UI mimics Okta’s admin dashboard - clean role-based controls, real-time sync status, one-click bulk operations.
Building the System
Project Setup
First, create the project structure:
mkdir -p day76_user_directory/{backend,frontend,ldap,docker}
mkdir -p day76_user_directory/backend/{app,tests}
mkdir -p day76_user_directory/backend/app/{api,models,services,core,schemas}
mkdir -p day76_user_directory/frontend/{src,public}
mkdir -p day76_user_directory/frontend/src/{components,services,pages,utils}
Backend Implementation
Installing Dependencies
Create a Python virtual environment and install the required packages:
cd day76_user_directory/backend
python3 -m venv venv
source venv/bin/activate
pip install fastapi uvicorn sqlalchemy psycopg2-binary python-ldap redis python3-saml celery pytest
The key libraries:
python-ldapfor directory integrationpython3-samlfor SSO supportredisfor caching and job queuesceleryfor async task processing
Database Schema Design
Define SQLAlchemy models for User, LDAPConfig, SAMLConfig, ImportJob, and AuditLog. The User model tracks status (pending/active/suspended/deprovisioned), provisioning method (manual/ldap_sync/sso_jit), LDAP DN, SAML NameID, sync timestamps, and relationships to audit logs.
Use proper indexes on frequently queried fields: username, email, status, and is_ldap_synced. Add a foreign key from AuditLog to User with cascade delete to maintain referential integrity.
LDAP Service Implementation
The LDAP service handles three key functions:
Connection Management: Initialize LDAP connections with proper protocol version (VERSION3) and referral settings. Implement connection pooling by maintaining a pool of authenticated connections that can be reused across requests.
Authentication Logic: First check Redis cache using the pattern ldap_auth:{username}. On cache miss, search LDAP for the user DN, attempt to bind as that user with the provided password (this validates the password), extract user attributes (email, department, employee type), cache the result for 5 minutes, and return user data.
Synchronization: Connect to LDAP, search for all users matching the filter (typically (objectClass=inetOrgPerson)), iterate through results extracting usernames and attributes, compare with local database (create new users, update existing ones, suspend removed ones), commit changes in batches, update the last_sync timestamp on the config.
SAML Service Implementation
The SAML service generates authentication requests and parses responses:
AuthN Request Generation: Create a unique request ID, set the current timestamp, build the SAML XML request with your entity ID and callback URL, base64 encode it, and return for redirection to the identity provider.
Response Parsing: Decode the base64 SAML response, parse the XML to extract the NameID and attribute statements, validate the signature (critical for security - reject tampered assertions), map attributes to your user fields based on the configured mapping, and return normalized user data.
JIT Provisioning: When enabled, extract user data from the SAML assertion, create a new User record with provisioning_method set to SSO_JIT, set status to Active, record the SAML NameID for future logins, and commit to database.
Lifecycle Service Implementation
The lifecycle service manages state transitions:
Transition Validation: Check if the requested transition is valid using the state machine rules. If invalid, return an error immediately. If valid, proceed with the transition.
State-Specific Actions: For activation, set last_login timestamp and trigger welcome email. For suspension, mark the user as suspended and trigger session revocation. For deprovisioning, set deprovisioned_at timestamp and schedule data anonymization.
Audit Logging: Create an AuditLog record for every transition with all required fields: user_id, action, details, performed_by, timestamp. Ensure logs are immutable after creation.
Import/Export Service Implementation
CSV Import: Parse uploaded CSV into rows, validate each row’s schema and data, create an ImportJob to track progress, process rows in batches of 100 (check if user exists, create or update accordingly), update job statistics (created_count, updated_count, failed_count), commit each batch separately, and store any errors in the job’s error_log field.
Streaming Export: Create a streaming response, write CSV header, query database in batches using yield_per(1000), write each user as a CSV row, flush to response stream, continue until all users exported. This keeps memory usage constant.
API Endpoints Structure
Create FastAPI routes for:
GET /users- List users with optional filtering by status, departmentPOST /users- Create new user manuallyPATCH /users/{id}- Update user detailsPOST /ldap/sync/{config_id}- Trigger directory syncPOST /ldap/authenticate- Authenticate against LDAPGET /saml/login- Initiate SSO flowPOST /saml/acs- Assertion consumer service (callback)POST /users/import- Bulk import from CSVGET /users/export- Bulk export to CSVPOST /users/{id}/lifecycle/transition- Change user statePOST /users/{id}/lifecycle/offboard- Complete offboarding workflowGET /stats/overview- Dashboard statistics
Frontend Dashboard
Technology Stack
Build with React 18+ and Material-UI for a professional enterprise look. The component structure includes:
App.js: Main layout with AppBar, Drawer navigation, and page routing
Dashboard.js: Statistics cards, pie chart for status distribution, bar chart for provisioning methods
UserList.js: Filterable table with status badges, pagination, LDAP sync indicators
LDAPSync.js: Configuration management, manual sync trigger buttons, last sync timestamps
ImportExport.js: File upload with progress tracking, export button with filter options
Lifecycle.js: User selection, state transition controls, stepper showing current state, offboarding workflow
Dashboard Features
The statistics dashboard displays total users, active count, pending count, suspended count, and LDAP sync percentage. Use Recharts for visualizations - a pie chart showing status distribution and a bar chart showing provisioning method breakdown. Update data by polling the /stats/overview endpoint every 5 seconds.
User List Features
Display users in a Material-UI Table with columns for username, email, full name, department, status (as a colored Chip), provisioning method, and LDAP sync status. Add filtering controls for status and department. Implement the filter by building query parameters and calling the API with those filters.
Real-time Updates
Use React’s useEffect with polling to refresh data. For import jobs, poll the job status endpoint every 2 seconds while status is “processing”. For LDAP sync, show a loading spinner during sync and refresh the user list when complete.
Infrastructure Setup
Docker Compose Configuration
Set up four services:
OpenLDAP Server: Use osixia/openldap:1.5.0 image, configure domain as example.com, mount the base.ldif file to populate initial users, expose ports 389 and 636.
Redis: Use redis:7-alpine, expose port 6379 for caching.
PostgreSQL: Use postgres:15-alpine, create database userdir with credentials, expose port 5432.
Backend and Frontend: Build from Dockerfiles, configure environment variables for database and LDAP connections.
LDAP Test Data
Create a base.ldif file with the organizational structure:
Base DN:
dc=example,dc=comOrganizational units:
ou=usersandou=groupsTest users: john.doe, jane.smith, admin with realistic attributes
Groups: engineers, sales with member assignments
This provides realistic test data for development and demonstrations.
Building and Running
With Docker (Recommended)
Navigate to the project directory and run:
cd day76_user_directory
docker-compose up -d --build
Wait about 15 seconds for all services to initialize. The services will be available at:
Frontend Dashboard: http://localhost:3000
Backend API: http://localhost:8000
API Documentation: http://localhost:8000/docs
LDAP Server: ldap://localhost:389
To view logs in real-time:
docker-compose logs -f
To stop all services:
docker-compose down
Local Development Setup
For development with hot-reload capabilities:
Start Infrastructure Services:
docker-compose up -d ldap redis postgres
Wait 10 seconds for initialization.
Backend:
cd backend
source venv/bin/activate
export DATABASE_URL="postgresql://userdir:userdir123@localhost:5432/userdir"
export REDIS_URL="redis://localhost:6379"
export LDAP_SERVER="ldap://localhost:389"
export LDAP_BASE_DN="dc=example,dc=com"
export LDAP_BIND_DN="cn=admin,dc=example,dc=com"
export LDAP_BIND_PASSWORD="admin"

# Run database migrations
python -c "from app.database import engine; from app.models import Base; Base.metadata.create_all(bind=engine)"

# Start server
uvicorn app.main:app --host 0.0.0.0 --port 8000 --reload
Frontend (in a new terminal):
cd frontend
npm install
npm start
The development servers will start with hot-reload enabled. Changes to backend code automatically restart the server, and frontend changes refresh the browser.
Testing the System
Backend Unit Tests
Run the test suite:
cd backend
source venv/bin/activate
pytest tests/ -v --cov=app --cov-report=term-missing
The tests verify:
User CRUD operations
LDAP authentication logic
SAML response parsing
Import/export functionality
Lifecycle state transitions
API endpoint responses
Expected output: All tests passing with 90%+ code coverage.
LDAP Integration Testing
Test 1: Directory Synchronization
Open the dashboard at http://localhost:3000, navigate to “LDAP Sync” page, and click “Sync Now” on the Primary LDAP configuration.
Expected result: Status shows “Sync completed” with statistics showing 3 users created (john.doe, jane.smith, admin). Navigate to Users page and verify all three users appear with status “Active” and “LDAP Synced” badge showing “Yes”.
Test 2: LDAP Authentication
Use the API documentation at http://localhost:8000/docs. Find the /api/v1/ldap/authenticate endpoint. Click “Try it out” and enter:
username:
john.doepassword:
password123
Click Execute.
Expected result: Response 200 with "authenticated": true and user data showing email john.doe@example.com, department “Engineering”.
Test 3: Cache Verification
Authenticate the same user again within 1 minute. Note the response time.
Expected result: Second request completes in under 50ms (cached), first request took 100-500ms (LDAP query).
SSO Flow Testing
Test 1: SAML Request Generation
Navigate to /api/v1/saml/login in the API docs. Execute the endpoint.
Expected result: Returns a base64-encoded SAML request and the IdP SSO URL. The request contains your entity ID and callback URL.
Test 2: JIT Provisioning
In the API docs, find /api/v1/saml/acs endpoint. This simulates the callback from an identity provider. Submit a sample SAML response (you can create a simplified one for testing).
Expected result: New user created automatically with provisioning_method “sso_jit”, status “active”. Check Users page to verify the new user appears.
Import/Export Testing
Test 1: CSV Import
Create a test CSV file:
username,email,full_name,department,employee_type,manager
testuser1,test1@example.com,Test User One,Engineering,Engineer,admin
testuser2,test2@example.com,Test User Two,Sales,Manager,admin
testuser3,test3@example.com,Test User Three,Engineering,Engineer,john.doe
Save as test_users.csv. In the dashboard, go to Import/Export page. Click “Upload CSV” and select your file.
Expected result: Progress bar appears, import completes with “Created: 3” shown. Navigate to Users page and verify all three test users appear with status “Pending”.
Test 2: Update Existing Users
Modify the CSV to change full names. Enable “Update existing users” toggle and upload again.
Expected result: Import shows “Updated: 3” instead of creating duplicates. Verify names changed in Users list.
Test 3: CSV Export
Click “Export to CSV” button on Import/Export page.
Expected result: CSV file downloads containing all users (including LDAP synced ones and imported ones). Open the file and verify it contains all expected columns and data.
Lifecycle Management Testing
Test 1: State Transitions
Navigate to Lifecycle page. Select a user with status “Pending”. Change target status to “Active” and click “Transition”.
Expected result: Success message appears, user state changes to Active. The stepper visualization updates to show the Active step highlighted. Check the audit logs in the database to verify the transition was recorded.
Test 2: Invalid Transition
Try to transition a “Deprovisioned” user to any other state.
Expected result: Error message appears explaining “Invalid transition from deprovisioned”. The system rejects the request.
Test 3: Offboarding Workflow
Select an Active user and click “Start Offboarding”.
Expected result: User transitions through Suspended to Deprovisioned automatically. Success message shows all offboarding steps completed with timestamps. Verify the user’s status is now “Deprovisioned” in the Users list.
Verification and Performance
Dashboard Verification
Open http://localhost:3000 and verify:
Total Users count matches expected (LDAP synced + imported + SSO)
Active Users percentage is calculated correctly
Pie chart shows proper distribution
Bar chart displays provisioning method breakdown
LDAP Sync Status shows sync percentage
All numbers should update when you refresh after making changes.
Performance Benchmarks
LDAP Authentication Speed:
Use a tool like Apache Bench or write a simple script to test authentication performance:
# First request (cache miss)
time curl -X POST "http://localhost:8000/api/v1/ldap/authenticate?username=john.doe&password=password123"
# Should take 100-500ms

# Second request within 5 minutes (cache hit)
time curl -X POST "http://localhost:8000/api/v1/ldap/authenticate?username=john.doe&password=password123"
# Should take <50ms
Import Performance:
Create a CSV with 1,000 users using a script or spreadsheet. Upload it and time the import.
Expected result: 1,000 users processed in under 10 seconds.
Cache Hit Rate:
Check Redis statistics:
redis-cli info stats | grep keyspace_hits
redis-cli info stats | grep keyspace_misses
Calculate hit rate: hits / (hits + misses) * 100
Expected result: Greater than 90% after running authentication tests multiple times.
Monitoring LDAP Connections
View active LDAP connections by adding logging to the LDAP service. The connection pool should maintain 10-20 connections and reuse them efficiently rather than creating new connections for each request.
Success Criteria
After completing this lesson, you should have achieved:
A fully functional LDAP integration authenticating users against an OpenLDAP server with sub-200ms latency
SSO support with SAML request generation and assertion parsing (simulated IdP for testing)
Bulk import/export handling CSV files with 1,000+ users processed asynchronously
Automated provisioning creating users from directory sync and JIT from SSO
Complete lifecycle state machine with audit trail for every transition
Professional admin dashboard with real-time statistics and sync status
Redis caching providing 90%+ cache hit rate for authentication
Test coverage validating all security-critical code paths
Assignment: Multi-Tenant LDAP Support
Extend the system to support multiple LDAP servers simultaneously, simulating a company with multiple subsidiaries each running their own directory.
Requirements:
Tenant Configuration UI - Add a form to create multiple LDAP configurations, each with a name, server URL, base DN, and credentials. Store these in the database.
Domain-Based Routing - When authenticating, examine the user’s email domain (e.g., @subsidiary1.com vs @subsidiary2.com). Route the authentication request to the correct LDAP server based on a domain-to-config mapping.
Health Monitoring - Create a background job that pings each LDAP server every 60 seconds. Test connectivity with a simple bind operation. Store the health status (up/down) and last check time for each tenant. Display this on the dashboard.
Tenant-Specific Import - When importing users, add a “tenant” field to the CSV. Route user creation to the appropriate LDAP server based on the tenant value. Handle conflicts when a username exists across multiple tenants.
Multi-Tenant Dashboard - Create a view showing sync status across all tenants. Display metrics for each: total users, last sync time, sync success/failure, health status. Add filtering to view users by tenant.
Bonus Challenge: Implement LDAP write-back capability. When users update their profile in your app (change phone number, job title), sync those changes back to the LDAP directory. This requires LDAP modify operations, careful permission management, transaction handling, and rollback on failure.
Solution Hints
Multi-Tenant Routing: Create a dictionary mapping email domains to LDAP config IDs. When authenticating, extract the domain from the email, look up the config, and use that for the LDAP connection.
Health Monitoring: Use APScheduler or Celery beat to run a task every 60 seconds. For each config, attempt ldap.initialize() and simple_bind_s(). If it succeeds, mark healthy. If it fails, mark unhealthy and log the error.
Conflict Resolution: When importing users, implement a resolution strategy. The simplest is timestamp-based: newest update wins. Store a last_modified timestamp on each user and compare during sync. More sophisticated: create a manual review queue for conflicts that an admin must resolve.
LDAP Write-Back: This is complex and dangerous if done wrong. First, ensure your LDAP bind user has write permissions. Use ldap.modify_s() with LDAP_MOD_REPLACE operations. Wrap in try/except to handle failures. Test extensively in a development LDAP server before using in production. Consider making it opt-in per tenant for safety.
Dashboard Aggregation: Use Redis to cache aggregated metrics. When displaying the multi-tenant view, query Redis for each tenant’s stats rather than hitting the database repeatedly. Update these cached values during each sync operation.
The implementation mirrors how Atlassian Cloud handles multiple directory integrations for organizations with complex IT infrastructure (acquisitions, subsidiaries, regional offices each with their own Active Directory).
What You’ve Learned
Today you built enterprise-grade identity integration covering:
Integration Patterns: Connection pooling, caching strategies, circuit breakers, async synchronization
Authentication Protocols: LDAP bind authentication, SAML SSO flows, signature validation
Data Management: Streaming exports, async imports, batch processing, job queues
State Machines: Lifecycle management with strict transitions, event-driven workflows
Compliance: Audit logging, data retention, GDPR considerations, SOC 2 requirements
These patterns apply far beyond identity management. The async processing pattern works for any bulk operation. The caching strategy applies to any slow external service. The state machine pattern fits workflow automation across domains. You now understand how enterprise software integrates with existing infrastructure without breaking under load or creating security vulnerabilities.
YouTube Demo Link:-
Day 77 - We’ll test the complete user management system end-to-end, validating security controls and performance under enterprise load scenarios. You’ll learn load testing with thousands of concurrent users, security penetration testing, and monitoring production-grade systems.